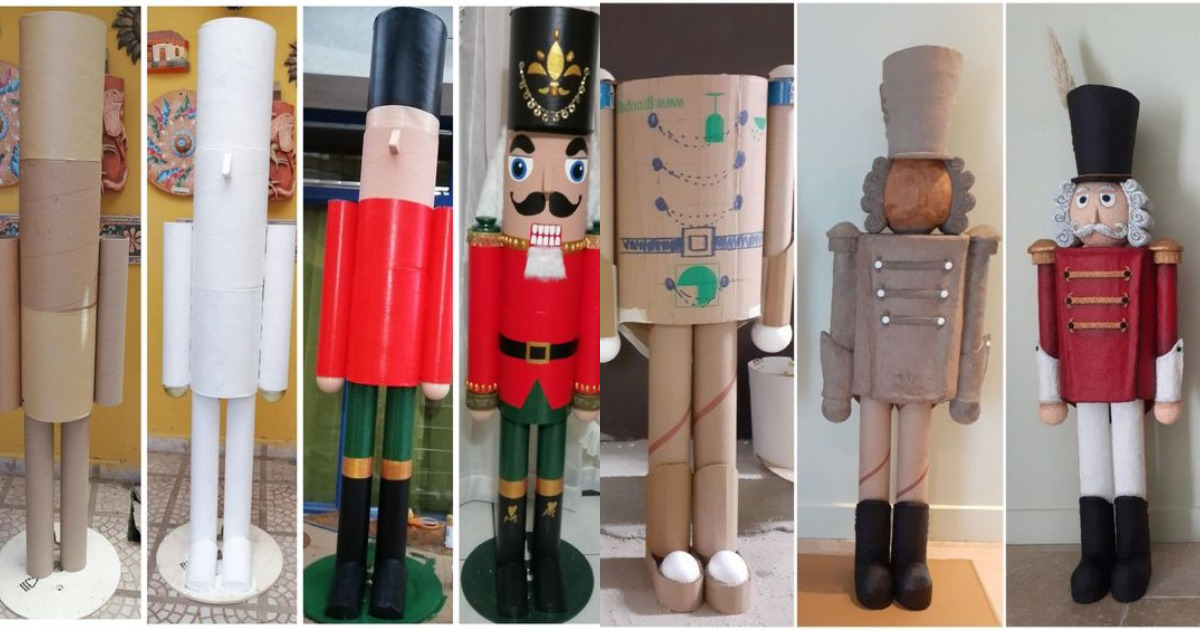
Crafting is becoming more and more popular in this digital age where people can be creative in any way they want. You can try making a nutcracker out of simple paper rolls, which is a fun and creative project.
Through this detailed guide, we will show you how to make your own snowman, which will add a touch of holiday cheer to your home decor.
Let your inner artist out and grab some paper rolls. Then let’s begin this fun do-it-yourself project.
How to Use Paper Rolls to Make a Nutcracker
At first, it might seem hard to make a nutcracker out of paper rolls, but if you’re patient and creative, you can do it yourself and have a great time. You will not only have a one-of-a-kind piece of art, but you will also enjoy making something by hand. Let’s start the process.


Get the following things ready before you start:
Rolls of toilet paper or paper towels that are empty
Folded out of cardboard
Glue for crafts
Paints made of acrylic
Brushes of paint
A mark
Cloth or felt scraps
Glitter for the pencil
Small decorations, like buttons, beads, and so on
Cleaning and Lighting Your Workspace: Make sure your crafting area is clean and well-lit so you can enjoy it. Protect your work area from paint and glue by putting down newspaper or a plastic tablecloth.
Making the body of the Nutcracker
4.1 Making the Torso Shaped
First, carefully smooth an empty paper roll. The base of your nutcracker’s body will be this. An oval-shaped piece of cardboard should be cut out and glued to the flattened roll to make the nutcracker’s body.


4.2 Making the legs and arms
Cut two smaller pieces from the paper rolls to use as arms and legs. They should be slightly bent to make a shape that looks like arms and legs. Use glue to attach these to the body.
4.3 Putting the Head on
To make the nutcracker’s head, cut a small circle out of cardboard. Use the pen to draw a face on it, making sure there is room for the hat. Connect this head to the top of the body with glue.
Making the face of the Nutcracker
Show off your art skills by painting the face of the nutcracker. Using acrylic paints, give the face expressive eyes, a smile with a red cheek, and a unique beard. To make your snowman stand out, don’t forget to use bright colors.
Step 6: Pick the Right Colors for Painting and Decorating Your Nutcracker
Choose bright, clashing colors for the nutcracker’s clothes. Most traditional nutcrackers are colored red, green, blue, and gold, but you can be artistic and come up with your own.
6.2 Putting in Accents and Details
To give the nutcracker’s outfit more depth, use paint, glitter, or small artistic items. Make your item truly one-of-a-kind by adding designs, buttons, and belts.
Making the Hat for the Nutcracker
Make a hat out of felt or leftover cloth. Depending on what you like, you can choose a traditional top hat or a fun Santa hat. Use glue to stick it to the nutcracker’s head.
The finishing touches
Take a step back and look at what you’ve done. Make any last changes or improvements that are needed. Dry your paper roll nutcracker all the way through before going on to the next step.
Putting up your paper roll nutcracker
Now that you’ve made your own snowman, you can use it to add some charm to your holiday decorations. You can display it on a mantel, a bookshelf, or your dinner table so that everyone can see it. It’s a great conversation starter and shows how creative you are.
Take care of and maintain
If you want your paper roll nutcracker to stay in good shape, keep it out of direct sunshine and damp places. If you need to, you can use a soft brush to lightly dust it to get rid of any dust that has built up.

